Setting Up A Police Scanner With An RTL-SDR (26 Jun 2020)
so my city has a community-run police scanner broadcast on the internet, but the person who runs it is a bootlicker who's been threatening to shut it down if people are using it to make trouble for the cops. so i figured i'd set up my own. this is how i did it, hope it's useful.
shopping
you'll need an RTL-SDR unit. i recommend the dipole antenna kit as well, so you don't need to make any additional purchases. if you're a radio enthusiast already, you might have a better antenna available, but if you're like me you do not and it's worth the US$10. mine took a bit over a week to arrive. if you're extremely unlucky, you might need two of them, but i was fine with just one.
basic setup
once your RTL-SDR arrives, you'll want to put together your antenna. if you're lucky, like i am, you can just extend the antennas arbitrarily and it'll work fine; if you're cursed, the RTL-SDR website has resources on how long is ideal for various frequencies.
connect the antenna to the RTL-SDR unit, plug it in, and follow the RTL-SDR quick start guide. SDRSharp will work, or any of the other Windows options. some of what we'll need is only available on windows.
once your RTL-SDR's drivers are sorted out, find the specifications for police radio in your area on RadioReference. click your state, click your county, scroll down and see if there's a link above a frequency table for you. if you're lucky, there is, and if you click it there's a page with a table with System Type and System Voice entries at the top. mine has a system type of EDACS Networked Standard and a system voice of ProVoice and Analog, so the rest of this assumes that's what you've got as well. if not, good luck.
there should be a table for System Frequencies on your RadioReference page. start up SDRSharp and tune your radio to the first frequency listed there. you'll probably hear a bunch of static and the UI will look something like this:
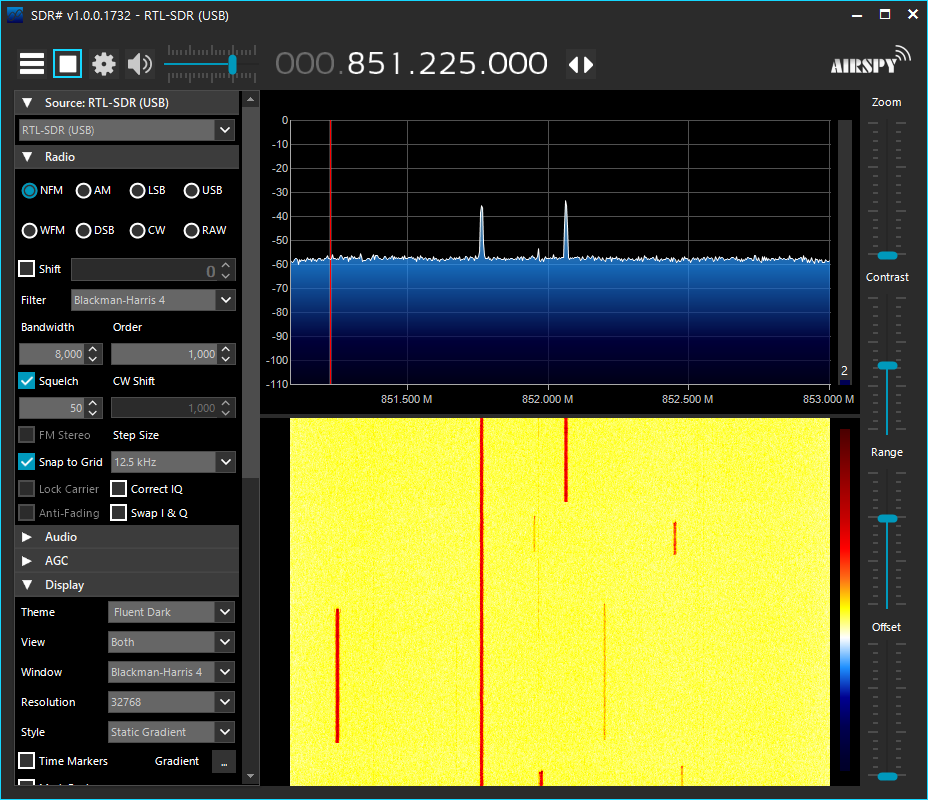
see how there's one constant signal and a bunch of other signals that appear and disappear all over the place? well, that's trunking, and the constant signal is our control channel. if you don't see it, you can click and drag on the bottom axis of the top panel to change the view. once you've found that constant signal, click on it to get the approximate frequency, go back to your frequency table and the closest thing to that will be the exact frequency. it should sound like a series of weird beeps instead of static. remember that frequency, it'll be important later.
update 2020-07-31: that control channel can change between the frequencies listed on RadioReference. if things randomly quit working, come back to this step, and see if the control channel has moved. i'll mark down below the places that need changing accordingly.
specific setup
EDACS is a trunked system, so we're using RTL-SDR's trunked radio tutorial as our guide, mostly. that guide assumes we have two RTL-SDRs, but there's a piece at the end explaining how to do it with just one. that sucks. i'm going to paraphrase it here.
first, we're going to download the software we need: Unitrunker, VB-Cable, and DSD+ (extract both the regular and DLL downloads to the same folder). install unitrunker and VB-Cable and extract dsd+ somewhere convenient. you might need to reboot after installing VB-Cable because computers are bad. VB-Cable might set your default input and output devices to the wrong things when you install it, so switch them back if it does.
open up dsd+. it'll open four different windows, one of them should have a list of audio input and output devices. check the number in the input list that goes with CABLE Output - for me it's 3. pull up notepad and make a new file. since my input was number 3, i'm typing
DSDPlus.exe -i3Min that file: if yours is not 3, put whatever the correct number is for you
instead of 3. then, save the file, find your DSDPlus folder, make sure the type
is set to "All Files", and name the file run.bat. close dsd+, go to that
folder, and open that run.bat file you just created. it should pull up dsd+
and if you're lucky it'll print
audio input device #3 (CABLE Output (VB-Audio Virtual ) initializedor something like that. leave that open.
open up unitrunker. click the + to add a new receiver, and click the RTL2832
button to add your RTL-SDR. set your settings around like this:
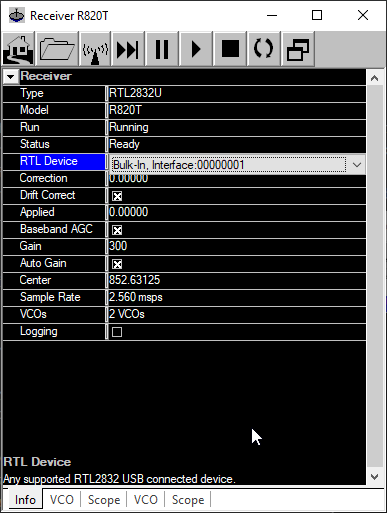
the most important things are the RTL Device, the sample rate (2.56 msps), and the VCOs (2 VCOs). i do not know what a VCO is and i do not care enough to find out. we should now have two VCO tabs next to our info tab. the first one needs to look kinda like this:
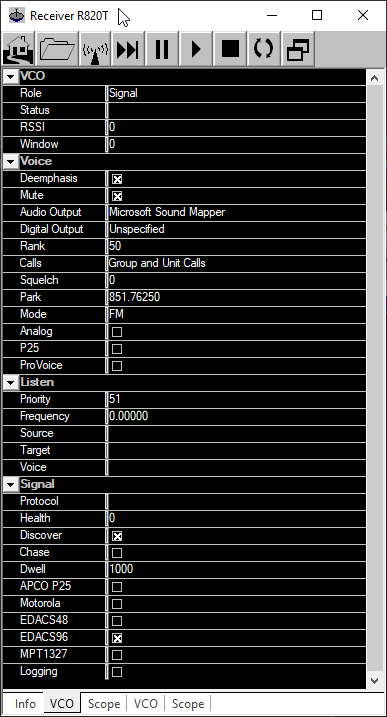
the important things are the Role being Signal, the Park frequency being the control channel we found earlier (mine is 851.7625), and the Mute box being checked.
update 2020-07-31: if the control channel changes, this Park frequency is one of the two things you'll need to update.
the second VCO should look kinda like this:
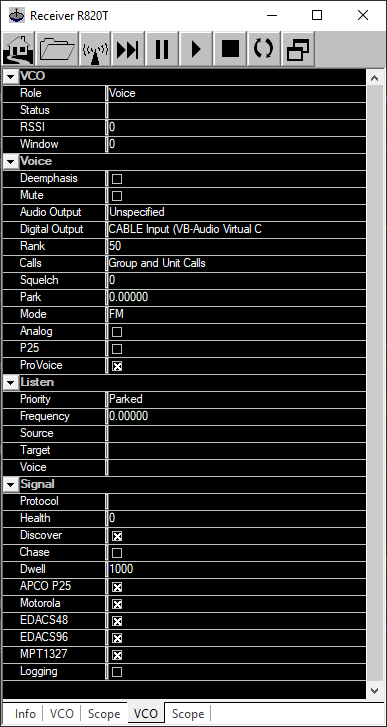
the important things are the Role being Voice, the Deemphasis box being unchecked, and the Digital Output being set to your CABLE Input. this means it will connect up with dsd+ listening to our CABLE Output.
press Play now; it should pull up a window with a Channels tab. the Channels tab should look something like this:
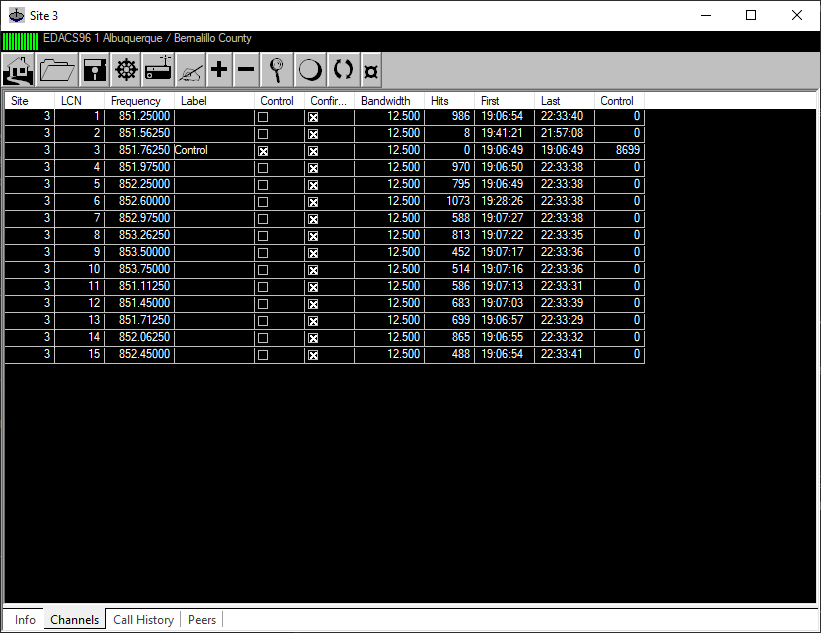
but the Frequency column will all be zeroes except for the control frequency we found earlier. you'll need to copy over the rest of the frequencies manually from the RadioReference site.
update 2020-07-31: if the control channel changes, you'll need to uncheck the Control box on the old control channel, and check the Control box on the new control channel.
press the stop button and the play button again, and everything should in theory be working. ideally, the Call History tab will be crowded and updating pretty frequently, and unitrunker will be passing things along to dsd+ which will give us the audio we want. technically, this is enough.
groups
the thing, though, is we don't have context for any of this. for now, at least. RadioReference should have a table or several of talkgroups - the "list all in one table" button may come in handy - and we can use that information to figure out who we're hearing, and have at least some control over who takes priority if multiple people in different contexts are talking at once.
find the main unitrunker window - it's titled "Universal Trunker" and if you don't have it open just click the home button a bunch until it opens - and then open the Systems tab and double-click the one that exists. open the Groups tab in that window, and it should give you a massive list with columns for ID, Label, and a bunch of stuff we don't care about right now. the ID matches up with the DEC column in the RadioReference table, and the Label can be either "Description" or "Alpha Tag" or something you make up yourself if you feel creative. if you pay RadioReference $15 for a Premium subscription then unitrunker can import that data automatically.
once you've filled that all in, open the Sites tab and double-click the entry you see there, then open the Call History tab. the group labels you added should now be appearing in the Audience column; the LCN and Frequency should turn green for what unitrunker is currently listening to.
back in the Groups tab, you can edit the Priority values to control which groups will be chosen more often - as far as i can tell, higher priority groups will interrupt lower priority groups, and equal priority groups will just play whoever started talking first.
broadcasting
this setup lets you listen to things locally, but what if you want your comrades with no hardware to be able to also listen? the laziest option is to just stream the Call History window on Twitch or something, but in theory there are better options. RadioReference runs Broadcastify, which is designed for hosting police scanner livestreams, but they have to manually approve your broadcast, which is annoying for short term activity. you could run an icecast server yourself or something, but that takes effort to configure. honestly all of those kinda suck but those are your options as far as i know.
update 2020-07-31: you can also let your friendly neighborhood succulent run an icecast server for you; reach out to me if you need something like this. if you've got an icecast server, you'll need to pay for (or otherwise obtain) VB-CABLE A+B, set up VB-CABLE A, and grab butt (broadcast using this tool).
you'll need to set DSD+ to output to "CABLE-A Input" like how you set it to input from "CABLE Output" - Cable A is the fourth output in DSD+, so my run.bat now looks like this:
DSDPlus.exe -i3M -o4run butt, pull up the settings, and under the Audio tab set the Input Device to "CABLE-A Output". (for bonus points, set the Streaming Codec to AAC+.) under the Main tab, Add a new Server and put in whatever info your icecast server admin told you to use. now restart your DSD+ and hit butt's play button to start streaming, and you should be running a livestream of your police scanner that is accessible over the internet.